As a passionate gardener, you know the struggle all too well: freshly planted plants, delicate roots, sun, wind – and a soil that seems to dry out by the minute. Keeping your precious flowers, herbs, and vegetables hydrated and thriving can feel like an endless battle against Mother Nature. But what if we told you there’s a simple, genius trick that can help your plants survive even the hottest, driest conditions?
Believe it or not, an old kitchen sponge can be the unexpected hero in your garden. With its incredible water-absorbing abilities, a humble sponge can transform your soil into a lush, self-watering oasis. Discover how this unassuming household item can revolutionize your gardening efforts and protect your plants from the ravages of drought stress.
Turning an Old Sponge into a Lifesaver for Your Plants
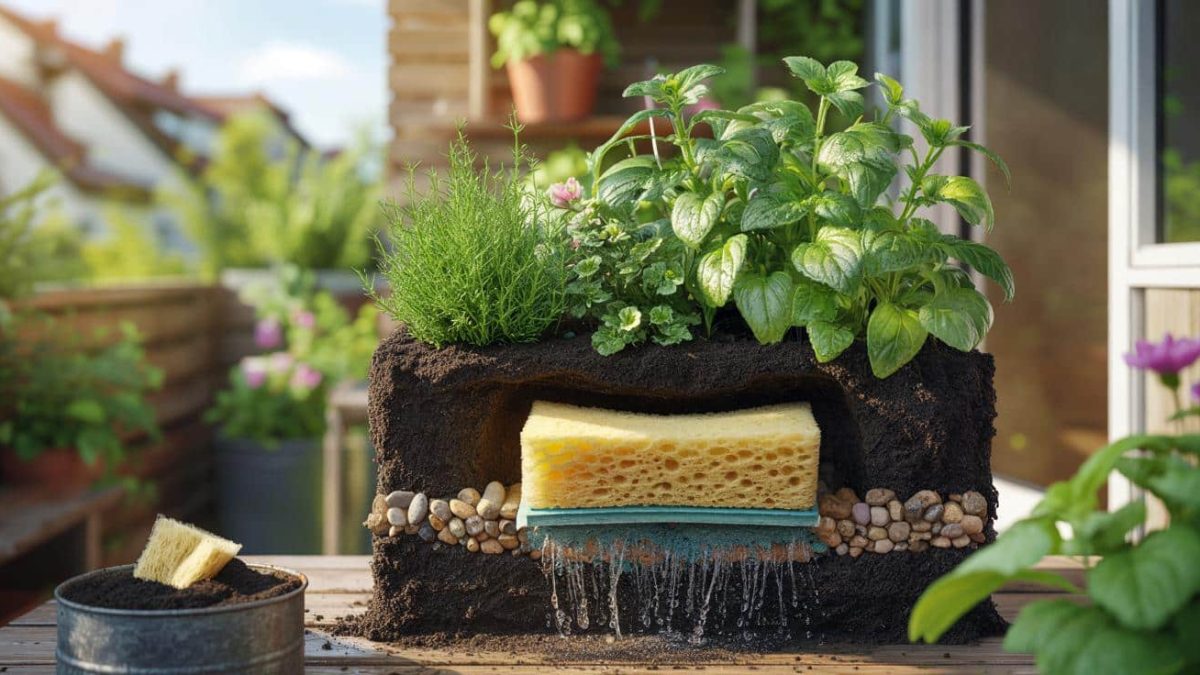
The secret lies in the sponge’s porous structure, which allows it to act as a natural water reservoir in your garden beds and potted plants. By strategically placing a well-soaked sponge in the soil, you create an efficient system that gradually releases moisture to the plant’s roots as needed.
This ingenious trick is especially helpful for delicate seedlings, tender perennials, and water-loving species that are prone to drying out. The sponge’s constant supply of moisture helps establish strong root systems and prevents wilting, ensuring your plants thrive even during the hottest, driest spells.
- ➡Warum viele Menschen beim Training falsch aufwärmen – ein Sportarzt erklärt die 3 Bewegungen, die wirklich sinnvoll sind
- ➡Der verhängnisvolle Fehler im März, der die Zitronenernte ruiniert
- ➡Seit dieser Marmorkuchen in meine Familie kam, wollen wir keinen anderen mehr
- ➡Der große Flüssigwaschmittel-Test: Diese Marken meistern hartnäckige Flecken am besten
Best of all, this method is incredibly easy to implement and requires minimal ongoing maintenance. Once you’ve set up the sponge, it will continue to work its magic, providing a steady, sustainable source of hydration for your beloved greenery.
Step-by-Step: Turning an Old Sponge into a Self-Watering Oasis
Transforming an old sponge into a garden savior is a simple process that anyone can master. Here’s a step-by-step guide to get you started:
- Choose the right sponge: Look for a natural, cellulose-based sponge that’s free of harsh chemicals or additives. Avoid synthetic sponges, as they may not absorb water as effectively.
- Prepare the sponge: Give the sponge a good rinse to remove any residual dirt or debris. Then, soak it in water until it’s fully saturated and dripping wet.
- Bury the sponge: Gently press the sponge into the soil, ensuring it’s completely submerged and in direct contact with the plant’s roots. Make sure to position it near the base of the plant, not too deep or shallow.
- Monitor and refill: Check the sponge regularly and refill it with water as needed, especially during periods of intense heat or drought. This will keep the sponge hydrated and your plants thriving.
Sponge Magic: Boosting Compost and Preventing Soil Compaction
The benefits of using a sponge in your garden don’t stop at providing a reliable water source. This versatile household item can also work wonders for your soil health and composting efforts.
By burying a sponge in your compost pile, you can help maintain optimal moisture levels and accelerate the decomposition process. The sponge will slowly release water, keeping the compost evenly moist and creating the perfect environment for beneficial microorganisms to thrive.
In addition, strategically placing sponges in high-traffic areas of your garden can help prevent soil compaction. The sponge’s cushioning effect will protect the delicate soil structure, allowing for better water infiltration and root growth.
Hygiene First: Preparing Your Sponge for the Garden
Before you start using an old sponge in your garden, it’s essential to ensure it’s free of any harmful bacteria or residues. Follow these simple steps to properly sanitize and prepare your sponge for its new role as a gardening hero:
- Disinfect the sponge: Soak the sponge in a diluted bleach solution (1 part bleach to 10 parts water) for 10-15 minutes. This will kill any lingering germs or pathogens.
- Rinse thoroughly: Rinse the sponge under running water to remove any trace of bleach. You want a completely clean, chemical-free sponge.
- Dry and store: Allow the sponge to air-dry completely before using it in your garden. Store it in a clean, dry container until you’re ready to put it to work.
Sponge-Powered Springtime Gardening Hacks
As the weather warms and your garden springs back to life, this sponge-based trick becomes an invaluable ally. Here are a few clever ways to put this humble household item to work in your springtime garden:
- Seed starting: Place a sponge in the bottom of seed trays or pots to create a self-watering system for your delicate seedlings.
- Transplanting aid: Soak a sponge in water, then tuck it around the root ball of a plant you’re transplanting. This will help the roots stay hydrated during the move.
- Potted plant support: Sink a sponge into the soil of your potted plants to ensure they have a constant supply of moisture, especially during hot, dry spells.
- Compost booster: Bury a sponge in your compost pile to regulate moisture levels and accelerate the decomposition process.
Knowing When to Replace Your Trusty Sponge
Like any loyal gardening companion, your trusty sponge will eventually reach the end of its useful life. But how can you tell when it’s time to retire your sponge and replace it with a fresh one?
- ➡Gesprächsgewohnheiten, die nach “hohem Status” aussehen – und Ihre Beziehungen schädigen
- ➡Mit 46 Jahren mit moderatem Krafttraining starten: Welche Übungen laut Trainern besonders sinnvoll sind
- ➡Der neue Frühstücks-Trend: Kiri bringt proteinreichen Skyr-Aufstrich in den Handel
- ➡Neue Dinosaurier-Spuren, alte Herkunft: Wie KI die Vogel-Evolution umschreibt
Keep an eye out for these telltale signs that your sponge is no longer up to the task:
- Reduced water absorption: If the sponge takes longer to become fully saturated or dries out faster, it’s time for a replacement.
- Discoloration or odor: A sponge that has become discolored, stained, or emits an unpleasant smell is likely harboring bacteria and should be discarded.
- Physical deterioration: If the sponge is starting to crumble, tear, or lose its structural integrity, it’s no longer effective and needs to be swapped out.
By regularly monitoring your sponge and replacing it when necessary, you’ll ensure your plants continue to enjoy the benefits of this ingenious hydration hack.
Why This Trick Is a Gardening Game-Changer Right Now
The sponge-in-the-soil method is particularly relevant and valuable in the current gardening landscape. As climate change increasingly brings unpredictable weather patterns and more frequent drought conditions, gardeners need reliable, low-maintenance strategies to protect their precious plants.
This sponge-based trick fits the bill perfectly. It requires minimal effort on your part but delivers outsized benefits in the form of healthier, more resilient plants. By providing a consistent, self-regulating source of moisture, the sponge helps your garden thrive even when Mother Nature turns up the heat.
- ➡Geniale Garten-Idee: Wie Klopapierrollen deine zarten Aussaaten retten
- ➡Shockwave at the Breakfast Table: How “Healthy” Children’s Drinks Become a Sugar Trap
- ➡Der professionelle Trick, um Badezimmerfugen ohne Chemie wieder weiß zu bekommen
- ➡Warum du dein Ladegerät besser nicht in der Steckdose lassen solltest
So, the next time you’re struggling to keep your plants hydrated, reach for an old kitchen sponge and let it work its magic. It just might be the secret weapon you need to create a lush, thriving garden that can withstand even the toughest environmental challenges.
FAQs: Sponge-Powered Gardening Solutions
Can I use any type of sponge in my garden?
For best results, stick to natural, cellulose-based sponges. Avoid synthetic sponges, as they may not absorb and release water as effectively.
How often do I need to refill the sponge?
Check the sponge regularly and refill it with water as needed, especially during hot, dry periods. The frequency will depend on your climate and the specific plants you’re growing.
Can I use the sponge trick for all my plants?
The sponge method works best for plants with high water needs, such as seedlings, tender perennials, and water-loving species. It may be less effective for drought-tolerant plants.
- ➡Garten-Mythos Eisheilige: Wer jetzt pflanzt, erntet deutlich früher
- ➡Von der Bedrohung zum Aufschwung: Wie der Koala sich zurückerkämpfte
- ➡Beware of Dangerous Processionary Caterpillars: Why Spring Walks with Dogs Remain Risky
- ➡Ist die Antarktis tatsächlich verboten? Die Wahrheit hinter den strengen Regeln
Where should I position the sponge in the soil?
Place the sponge near the base of the plant, ensuring it’s in direct contact with the roots. Avoid burying it too deep or leaving it too shallow.
How do I clean and disinfect the sponge before using it?
Soak the sponge in a diluted bleach solution, then rinse it thoroughly to remove any chemical residue. This will help prevent the introduction of harmful bacteria into your garden.
Can I use the sponge trick in raised beds and containers?
Absolutely! The sponge method works just as well in raised beds and potted plants, helping to keep your container-grown plants hydrated and thriving.
How long will a single sponge last in my garden?
The lifespan of a sponge will depend on factors like its quality, the climate, and the specific plants it’s supporting. As a general rule, replace the sponge when it starts to show signs of deterioration or reduced water-holding capacity.
- ➡Energiespar-Trick ab März: Warum Sie ab 19:45 Uhr Ihre Vorhänge schließen sollten
- ➡Der geniale Rasen-Trick mit Toilettenpapier: Kahle Stellen mühelos auffüllen
- ➡Australien-Reise mit eSIM: Wie Sie überall günstig online bleiben
- ➡Großangelegte Studie mit 48.500 Hunden widerlegt den Mythos der Dressurwilligkeit
Can I use the sponge trick to water my entire garden?
While the sponge can be a valuable tool for targeted hydration, it’s not a replacement for a comprehensive watering system. Use the sponge method to support specific plants, while still providing broader irrigation as needed.