Have you ever noticed how quickly terracotta pots in the garden or on the balcony can become unsightly? Stains, efflorescence, and green deposits can make even the most charming pots look worn and neglected. But what if we told you there’s a simple, cost-effective way to transform those weathered pots into beautiful, ceramic-like pieces?
In this article, we’ll guide you through a genius DIY project that will have your old terracotta pots looking brand new for less than €10. Get ready to turn your garden eyesores into stunning centerpieces!
Why Terracotta Pots Become Unsightly Outdoors
Terracotta is a porous material that readily absorbs moisture, making it susceptible to a variety of weathering issues. Stains, mineral deposits, and algae growth can quickly diminish the natural beauty of these earthy pots. The good news is that with a little elbow grease and some creative DIY techniques, you can restore their appearance and extend their lifespan.
One of the main culprits behind the deterioration of outdoor terracotta is the constant exposure to the elements. Rain, sun, and temperature fluctuations can cause the pots to crack, flake, and discolor over time. Additionally, the porous nature of the material allows for the buildup of minerals and organic matter, leading to unsightly stains and efflorescence.
- ➡Warum manche Erwachsenen trotz voller Agenda keine echten Freundschaften haben
- ➡Die perfekte Büro-Uhr: So passt sie wirklich zu deinem Outfit
- ➡CES 2026: Micro RGB, die neue Bildschirmgeneration, stellt OLED in den Schatten
- ➡Rätsel auf dem Mars: Der Nasa-Rover entdeckt eine organische Spur ohne irdische Erklärung
But fear not, with the right approach, you can transform those drab pots into stunning, ceramic-inspired centerpieces for your garden or balcony.
Step 1: Thorough Cleaning Instead of a Quick Brush
The first step to reviving your terracotta pots is to give them a deep, thorough cleaning. Resist the temptation to simply brush off the surface dirt and stains – that won’t be enough to truly restore their appearance. Instead, take the time to soak the pots in a solution of warm water and mild detergent, scrubbing away any stubborn deposits with a stiff-bristled brush.
Once the pots are clean, rinse them thoroughly to remove any lingering soap residue. This will ensure a smooth, even surface for the next steps in your transformation process.
Remember, patience and attention to detail are key when it comes to restoring the condition of your terracotta pots. A little extra effort now will pay off in the long run with a beautifully rejuvenated final product.
Step 2: Sealing the Interior to Keep the Exterior Finish
Now that your pots are sparkling clean, it’s time to seal the interior to prevent moisture from seeping through and compromising the exterior finish. This step is crucial, as it will ensure your hard work lasts and the new “ceramic” look you create remains intact.
You can use a variety of sealants, from clear polyurethane to specialty pot sealers. Apply the sealant evenly to the inside of the pots, being careful not to let it drip or pool on the exterior. Allow the sealant to dry completely according to the manufacturer’s instructions before moving on to the next step.
By sealing the interior, you’re creating a barrier that will protect the outside of the pots from the ravages of weather and prevent any unsightly stains or discoloration from developing over time.
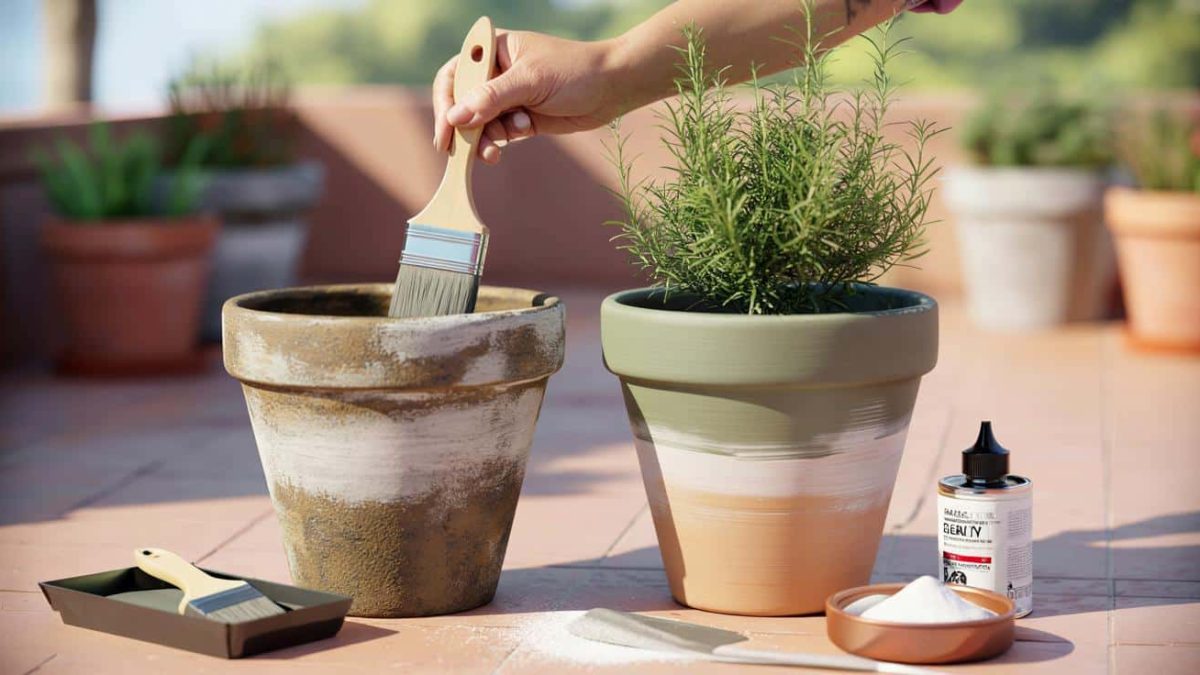
Step 3: The “Ceramic” Finish Trick Mixture
Now, the fun part! To achieve that stunning, ceramic-inspired look, you’ll need to create a special paint mixture. This blend of ingredients will give your terracotta pots a smooth, uniform finish that mimics the appearance of high-end ceramic vessels.
The key ingredients in this “ceramic” finish trick are acrylic paint, joint compound, and a touch of water. By mixing these together, you’ll create a pliable, spreadable paste that can be applied evenly to the exterior of the pots. The joint compound will help fill in any minor cracks or imperfections, while the acrylic paint will provide the desired color and sheen.
Experiment with different paint colors to find the perfect match for your garden or balcony aesthetic. From soft, neutral tones to vibrant, eye-catching hues, the possibilities are endless!
Step 4: Properly Applying the Finish
Once you’ve mixed up your “ceramic” finish, it’s time to start applying it to the exterior of the pots. Take your time and work in sections, using a clean, stiff-bristled brush to evenly distribute the mixture across the surface.
Be sure to pay close attention to the edges and any recessed areas, ensuring full coverage to create a seamless, professional-looking finish. Don’t worry if the first coat doesn’t seem thick enough – you can always apply a second layer for added depth and opacity.
- ➡Gemüse, die von selbst wiederkommen: Wie Ihr Garten fast autonom wird
- ➡Darmbakterien verwandeln Fett in Energie: Eine neue Hoffnung im Kampf gegen Übergewicht
- ➡Dunkle Schokolade statt Apfel? Wie gesund der süße Snack wirklich ist
- ➡Warum Lieder aus unserer Jugend Gefühle wecken, die längst vergessen schienen
As you work, keep a spray bottle of water nearby to lightly mist the surface. This will help the mixture spread smoothly and prevent it from drying out too quickly, which can lead to an uneven or textured appearance.
Step 5: Matte Sealing for Rain and Sun Protection
The final step in your DIY “ceramic” pot transformation is to apply a protective, matte sealant. This will not only enhance the overall appearance of your pots but also help them withstand the elements for seasons to come.
Look for a clear, weatherproof sealant that will leave a subtle, matte finish. Apply it evenly across the exterior of the pots, taking care to cover all surfaces. This protective layer will shield your new “ceramic” finish from the damaging effects of rain, sun, and other outdoor conditions.
Once the sealant has dried, your transformed terracotta pots are ready to be planted or displayed with pride. Enjoy the satisfaction of turning old, weathered vessels into stunning, ceramic-inspired centerpieces for your garden or balcony.
- ➡Lidl-Kundin verzichtet auf beliebten Croissant-Klassiker nach Etiketten-Schock
- ➡Alarming Skunk Infestation in the Garden: How to Safely Get Rid of the Pest
- ➡Wie du aus deiner Grünlilie eine einzigartige Pflanzenskulptur machst
- ➡Der neue Glasfaser-Turbo: Wie Pure Fibre B&YOU den Alltag mit Hochgeschwindigkeits-Internet beschleunigt
Planting Considerations for Your Renewed Pots
Now that your terracotta pots have been transformed into beautiful, “ceramic” containers, it’s important to keep a few planting considerations in mind. The sealant and paint mixture you’ve applied may affect the porosity of the material, so you’ll want to adjust your watering and soil selection accordingly.
Start by choosing plants that thrive in well-draining soil, as the reduced porosity of the sealed pots may lead to waterlogging if you’re not careful. Succulents, herbs, and drought-tolerant perennials are all excellent options that will complement the updated look of your pots.
Additionally, be mindful of the depth and size of your plants, as the added layers of sealant and paint may slightly reduce the interior volume of the pots. Adjust your plant selections and soil depths to ensure optimal growth and healthy root systems.
Real-World Examples: From Eyesore to Showstopper
Still not convinced that this DIY transformation can work wonders? Take a look at some real-life examples of weathered terracotta pots that have been rejuvenated using this technique.
- ➡Supermarket Cashiers Speak Out: These Customer Phrases Are Driving Them Crazy
- ➡Genius Garden Trick: How an Old Sponge Protects Your Plants from Drought Stress
- ➡Der Milliardärsrekord: Wie Elon Musk die Super-Reichen abgehängt hat
- ➡Waschen zur Unzeit: Warum Stromspitzen zwischen 8 und 20 Uhr richtig teuer werden
One gardener transformed a collection of cracked, discolored pots into a stunning display of matte-finished, ceramic-inspired vessels in shades of white and soft gray. The end result is a cohesive, high-end look that complements her minimalist garden design perfectly.
Another balcony enthusiast breathed new life into a set of terracotta planters by painting them a vibrant, eye-catching blue. The “ceramic” finish adds depth and texture, making the pots the focal point of her cozy outdoor oasis.
These examples showcase the versatility and transformative power of this DIY project. With a little effort and creativity, you can turn your weathered terracotta pots into beautiful, ceramic-inspired centerpieces that will elevate the look of your entire outdoor space.
Risks, Pitfalls, and How to Avoid Them
As with any DIY project, there are a few potential risks and pitfalls to be aware of when transforming your terracotta pots. But with the right approach and a little caution, you can easily overcome these challenges and achieve stunning results.
One common issue is the risk of the paint or sealant peeling or chipping over time. To prevent this, be sure to thoroughly clean and prepare the pots before applying the “ceramic” finish. Proper surface preparation is key to ensuring a long-lasting, durable result.
Another potential problem is an uneven or textured finish. To avoid this, take your time when applying the paint mixture and be mindful of your brush strokes. Misting the surface with water can also help create a smooth, even appearance.
Finally, be cautious of using the wrong sealant or paint, which could react with the terracotta material and cause discoloration or other unwanted effects. Always test a small, inconspicuous area first and follow the manufacturer’s instructions carefully.
Why the Effort Is Worth It (Beyond Just Looks)
Transforming your weathered terracotta pots into beautiful, ceramic-inspired vessels isn’t just about aesthetics – it can also have practical benefits for your outdoor space.
- ➡Geheimnisse des Meeresbodens: Diese unsichtbaren Landschaften prägen unseren Planeten
- ➡Traumhaus, Alptraum-Kredit: Wie eine Familie am Eigenheim fast zerbrach
- ➡Alte Schrankwand raus: Wie ein offenes System deine Wohnung größer erscheinen lässt
- ➡Rhein-Stromfische: Schwimmende Turbinen sollen ganze Ortschaft versorgen
By sealing the interior of the pots and applying a protective sealant to the exterior, you’re not only enhancing their appearance but also extending their lifespan. This can save you money in the long run by reducing the need for frequent pot replacements.
Additionally, the added sealant and paint layers can improve the pots’ resistance to the elements, making them better equipped to withstand the rigors of outdoor use. This means your renewed containers will continue to look their best for seasons to come, whether they’re adorning your garden, patio, or balcony.
FAQ
Can I use this technique on any type of terracotta pot?
Yes, this DIY “ceramic” finish can be applied to a variety of terracotta pots, from small planters to large, oversized containers. The key is to ensure the pots are thoroughly cleaned and prepared before starting the transformation process.
How long does the “ceramic” finish last?
With proper application and care, the “ceramic” finish can last for several years. The protective sealant layer is essential for ensuring the paint and texture remain intact, even in outdoor conditions.
Can I use this technique on other types of pots, like plastic or metal?
This specific DIY “ceramic” finish is designed for use on terracotta pots. While you may be able to adapt the techniques for other materials, the results may not be as seamless or long-lasting. For best results, stick to transforming genuine terracotta containers.
Do I need to use a specific type of paint or sealant?
While you can experiment with different products, it’s recommended to use high-quality acrylic paint and a clear, weatherproof sealant designed for outdoor use. This will ensure the best possible results and long-lasting protection for your transformed pots.
Can I use this technique on pots that already have a glaze or finish?
For best results, it’s recommended to start with unfinished, raw terracotta pots. Applying the “ceramic” finish over an existing glaze or paint may not provide the same seamless, high-quality look. If you do attempt to transform a pre-finished pot, be sure to thoroughly clean and lightly sand the surface first.
Do I need to seal the interior of the pots?
Yes, sealing the interior of the pots is a crucial step in this DIY transformation. It helps prevent moisture from seeping through and compromising the exterior finish, ensuring your “ceramic” look lasts.
- ➡Wie Sie mit einem Kräutertrick Ihren Tomaten mehr Geschmack verleihen können
- ➡Wie der Gang eines Menschen enthüllt, ob er heimlich gefährlich ist
- ➡Nie wieder teuren Scheibenreiniger kaufen: Diese einfache Mischung spart richtig Geld
- ➡Gigantisches Einkaufszentrum bei Paris verwaist: Wie ein Shopping-Tempel zum Geister-Mall wurde
Can I reuse the transformed pots for planting?
Absolutely! The “ceramic” finish is durable enough to withstand regular planting and watering. Just be mindful of the reduced porosity and adjust your plant selections and watering habits accordingly.
How do I clean and maintain the transformed pots?
Cleaning the transformed pots is easy – simply wipe them down with a damp cloth or use a mild, plant-safe cleaning solution. Avoid using abrasive cleaners or scrubbers, as they could damage the “ceramic” finish. Reapply the protective sealant every 1-2 years to maintain the look and durability.
Can I paint the pots a different color after the initial transformation?
Yes, you can repaint the pots with a different color if desired. However, be sure to lightly sand the existing “ceramic” finish first to ensure the new paint adheres properly. This will allow you to easily update the look of your transformed pots over time.