Clearing clutter and maintaining order in the kitchen, home office, or bathroom can feel like a never-ending battle. No matter how much you organize, there always seems to be a lack of free surface space. But what if the solution was hiding in plain sight all along – in the form of unused wood scraps?
Repurposing old wood pieces into clever storage and organization solutions can be a game-changer for maximizing limited work areas. With a few simple DIY projects, you can transform your cluttered countertops, desktops, and vanities into neatly organized, functional spaces. The best part? These wood hacks are surprisingly easy to execute and won’t break the bank.
Which Woods Work Best for Organization Hacks?
Not all wood is created equal when it comes to DIY projects. Certain types are better suited for crafting organizational tools than others. Hardwoods like oak, maple, and walnut tend to be more durable and stable, making them ideal choices. Softwoods like pine are generally less expensive but may not hold up as well over time.
Recycled or reclaimed wood is also a fantastic option, giving new life to materials that would otherwise end up in a landfill. Just make sure any salvaged wood is free of nails, screws, or other hardware that could be difficult to remove.
Before starting your wood hacking journey, take inventory of what materials you have on hand – whether it’s leftover scraps from a previous project or wood you’ve been storing for a rainy day. This will help guide your DIY plans and ensure you’re working with the right supplies.
Preparing Wood for Organizational Projects
Once you’ve selected the perfect wood for your needs, it’s time to get it ready for construction. This typically involves a few simple steps:
- Cleaning: Give the wood a thorough cleaning to remove any dirt, dust, or debris that could interfere with the final finish.
- Sanding: Use a palm sander or sandpaper to smooth out any rough edges or uneven surfaces. This will ensure a professional-looking final product.
- Cutting: Measure and cut the wood to the desired sizes using a saw. Be sure to wear appropriate safety gear like goggles and gloves.
- Finishing: Apply a clear sealant, stain, or paint to protect the wood and give it a polished appearance.
With your materials prepped and ready, you can now dive into the fun part – bringing your organizational wood hacks to life!
14 Ingenious Wood Organization Hacks
From floating shelves to tiered spice racks, the possibilities for transforming cluttered spaces with wood are endless. Here are 14 clever DIY projects that will help you regain control of your kitchen, home office, bathroom, and beyond:
- ➡Neues intimes Gadget zur sanften Absaugung von Sperma – Kann das den Alltag von Frauen wirklich erleichtern?
- ➡Der karibische Traum im März: Diese Insel lockt mit 365 Stränden und 29 Grad Celsius
- ➡Schluss mit Anti-Aging-Cremes: Wie neue Collagen-Perlen Falten von innen heraus glätten
- ➡Ist die Antarktis tatsächlich verboten? Die Wahrheit hinter den strengen Regeln
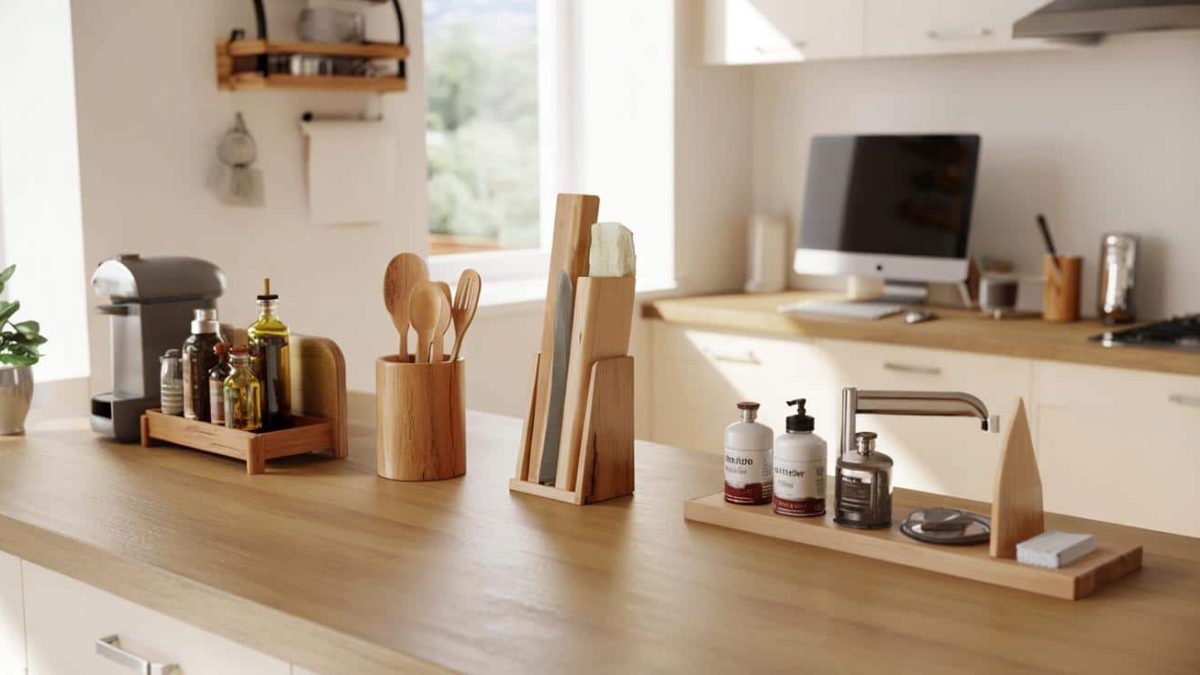
Kitchen Organization Hacks
The kitchen is often ground zero for clutter, with countless gadgets, utensils, and supplies competing for precious counter and cabinet space. Luckily, wood can come to the rescue with these smart storage solutions:
- Vertical Spice Rack: Create a tiered spice rack that mounts to the wall, freeing up drawer and cabinet space.
- Hanging Mug Holder: Hang a wooden plank with drilled holes to neatly display and store coffee mugs.
- Knife Block: Ditch the bulky plastic knife block for a sleek, wooden version that mounts to the wall.
- Cookbook Stand: Construct a simple wooden stand to prop up and display your favorite cookbooks.
Home Office Organization Hacks
When your home office is overflowing with papers, cables, and miscellaneous supplies, these wood-based projects can bring order to the chaos:
- Floating Shelves: Install minimalist floating shelves above your desk to store books, décor, and office essentials.
- Desk Organizer Tray: Craft a tiered wooden tray to corral pens, paper clips, and other desk accessories.
- Cable Management Box: Build a wooden box to hide and organize unsightly cords and cables.
- Wall-Mounted Pegboard: Create a customizable pegboard system to hang tools, supplies, and more.
Bathroom Organization Hacks
The bathroom can quickly become a cluttered mess of toiletries, towels, and beauty products. These wood-based hacks will help restore order:
- Floating Vanity Shelves: Install wooden floating shelves above your vanity to store and display items.
- Tiered Bathroom Caddy: Construct a multi-level wooden caddy to hold soaps, shampoos, and other toiletries.
- Towel Ladder: Build a simple wooden ladder to neatly hang and display bath towels.
- Wall-Mounted Toilet Paper Holder: Craft a wooden holder that mounts to the wall to free up floor space.
Hallway and Entryway Organization Hacks
The often-overlooked hallway and entryway can also benefit from smart wood-based storage solutions:
- Coat Rack with Shelves: Combine a wooden coat rack with shelves to hold hats, gloves, and other outerwear accessories.
- Cubby Storage Unit: Build a modular cubby system to neatly organize shoes, bags, and other items.
- Floating Key Holder: Craft a simple wooden plaque with hooks to keep keys, lanyards, and other small items in one place.
The Benefits of Wooden Organization Hacks
Beyond the practical advantages of regaining valuable surface space, investing in DIY wood organization projects offers several other benefits:
- Customizable Design: Wood allows you to create custom storage solutions tailored to the specific needs and dimensions of your spaces.
- Durable Construction: Properly sealed and finished, wooden organizational tools are built to last.
- Elevated Aesthetics: Wooden pieces bring a warm, natural, and sophisticated look to any room.
- Cost-Effective: Many of these projects can be completed for a fraction of the cost of store-bought organizational products.
With a little creativity and a few basic tools, you can transform your cluttered spaces into streamlined, functional areas that truly work for you. So why not get started on your first wood-based organization hack today?
Frequently Asked Questions
What types of wood work best for organization projects?
Hardwoods like oak, maple, and walnut tend to be the most durable and stable options. Softwoods like pine are less expensive but may not hold up as well over time. Recycled or reclaimed wood is also a great choice, as long as it’s free of nails and other hardware.
How do I prepare wood for organization projects?
Start by thoroughly cleaning the wood to remove any dirt or debris. Then, sand it down to ensure a smooth, even surface. Next, measure and cut the wood to your desired sizes using a saw. Finally, apply a clear sealant, stain, or paint to protect the wood and give it a polished look.
- ➡Breakthrough in Head and Neck Cancer: New Approach Makes HPV Tumors Vulnerable Again
- ➡Studie enthüllt: Warum Laufschuhe für Frauen oft nicht zu ihren Füßen passen
- ➡Warum so viele an einfachen Heimjobs scheitern – von der Heizung bis zur Glühbirne
- ➡Nivea’s New Anti-Wrinkle Care: Is the Iconic Tin Facing Extinction?
Can I customize these wood organization hacks for my specific spaces?
Absolutely! The beauty of working with wood is that you can easily adapt these projects to fit your unique needs and dimensions. Measure your available wall, counter, or cabinet space, and then design your organizational solutions accordingly.
How difficult are these wood organization projects to make?
Most of these hacks are relatively straightforward and can be completed with basic woodworking tools and skills. As long as you take the time to properly measure, cut, and assemble the pieces, you should be able to create professional-looking results.
Will these wood organization solutions last over time?
Yes, properly sealed and finished wood is extremely durable and long-lasting. With proper care and maintenance, your DIY wood organization projects should continue to serve you well for many years to come.
Can I use these wood hacks in any room of my home?
Absolutely! The organizational solutions featured in this article can be tailored for use in the kitchen, home office, bathroom, hallway, entryway, and beyond. Get creative and think about how you can maximize storage and declutter each of your living spaces.
Are these wood organization projects cost-effective?
Yes, one of the major benefits of DIY wood hacks is that they tend to be much more budget-friendly than store-bought organizational products. With a little elbow grease and some basic supplies, you can create custom storage solutions for a fraction of the retail price.
Do I need special tools to make these wood organization projects?
While a few power tools like a saw and sander can be helpful, most of these projects can be completed using only basic hand tools. As long as you have the essentials like a hammer, screwdriver, and measuring tape, you should be able to bring your wood organization ideas to life.